• By Clay Rollyson
  • /
  • /
It always reeks of a “sales pitch” when a company tells you that you need to buy more of what they sell. So, in this blog I am going to do my best to keep the sales part down and the information part up. The fact of the matter is that you MUST change parts on your CPAP from time to time to avoid significant issues. Most of the issues caused by procrastinating on this maintenance are slow creeping issues. You may not even notice that they are becoming issues until you have a big issue. There are 3 things in my opinion that must be changed out regularly. Mask Seal, CPAP filter and CPAP tubing. Let’s dive deeper on each below.

When to change out your CPAP Mask seal:

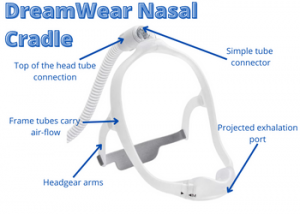
The mask seal is probably the most critical component of your CPAPs functionality. If you have a bad seal, you will have bad therapy. This is for a lot of reasons but is especially serious when you are on an Auto CPAP. Which MANY CPAP users are these days. That is because when the mask doesn’t seal the CPAP tries to make up for the leak by increasing airflow. Which almost always creates a worse leak. This snowballs until you call your provider and tell them that the CPAP isn’t working. To avoid this issue changing out the mask seal before it goes bad is the best bet. So how do you know when?

1) Are you tightening your CPAP Mask headgear more?

The first sign of a CPAP Mask seal going bad is the tightening of the headgear. For over a month your mask has sealed really well, and now you are having to tighten the headgear a bit more every other night. This is almost certainly because the seal is beginning to wear out. When the silicone on the mask seal starts to deteriorate, it gets flimsy and starts to leak. To account for this leak, you pull the straps tighter on the mask. It solves the issue for tonight, but just returns in the nights to come. Eventually, you cause yourself abrasion issues on the high-pressure points and have to go a few nights without CPAP while the bridge of your nose heals. All of this would have been avoided if you had just changed out that seal when you noticed the first sign of leaking.

2) Are your Therapy reports getting worse?

Almost all CPAP machines have an app or an ability to report your CPAP therapy statistics. To learn more about those reports visit our therapy report blog here. Most of those reports will give you a “leak” rating. You will notice that rating stays pretty steady when you are doing well on your CPAP. Then, just like the headgear issue, it begins to slide. You will notice that the leak LPM may go up gradually or that your Mask Seal score is going down. This is your opportunity to avoid the critical failure and get a new mask seal.

3) Having trouble sleeping in your normal position?

When you first started with your new favorite mask you were sleeping so well in that favorite position. Now, you get there and wake up to your spouse poking you because your mask is whistling. You have to ask yourself, “what has changed?”. It is almost always the seal. Therapy pressures typically stay pretty similar once you get settled in on your CPAP. So, while you might think it is the CPAP changing and causing the issue, it is most likely not.

4) Is your CPAP Pressure getting too high?

This is probably the most difficult issue we face when CPAP users procrastinate on changing out the seal. A TON of CPAP users are on Auto CPAP. Click here to learn what “Auto CPAP” is. When you are on Auto CPAP the CPAP will adjust the pressure to account for your apnea. It will also attempt to account for leaks in the same way. This means that when your mask seal goes bad, the CPAP may increase pressure to account for the leak. This in turn makes the leak worse and worse. The worst part about this issue is that even after you resolve the leak by changing out the seal, you still may have a few nights before the pressure comes back down on the Auto-CPAP.

When to change out your CPAP filter:

This is by far the simplest and cheapest thing that you have to maintain on your CPAP. Failing to maintain the filter is also the number one reason why CPAPs fail. There is no reason not to change out your CPAP filter at least once per month. They are a couple dollars at most and take 2 seconds to change out. I recommend checking them weekly to look for discoloration and to change them as soon as you see any dust or dirt. For people with pets this is especially important. You do not even realize how much pet dander is in the air, and that CPAP filter is catching it all.

What happens when you don’t change the CPAP filter?

If you leave a dirty filter in the CPAP, it will get worse and worse until the CPAP cannot even pull enough air to maintain your proper pressure. Time and time again we have customers come in saying that the CPAP isn’t blowing enough anymore. We open the filter door and call the hazmat team to remove the black filter inside. Then the CPAP is working again. Not only can the dirty filter cause therapy issues, but it will eventually destroy the CPAP motor. Like any motor, the CPAP motor works well when it is able to move freely. When it is strained it causes issues. You will usually notice some groaning coming from the CPAP at first, then it gets louder. At this point the CPAP is shot and will need to be repaired or replaced. Check out our CPAP repair blog for more details on that. 

When to change out your CPAP Tubing?

This is another part that is pretty inexpensive to change out. As long as you are using regular CPAP tubing. If you are on heated tubing it can be more expensive. If you aren’t sure that you should be on heated tubing, check out our blog discussing that topic here. My sole recommendation on the CPAP tubing is to have an extra one on hand. It simply cannot hurt to have an extra. The signs of needing to change out the tubing in advance of it failing are pretty simple:

Signs of it being time to change the tubing:

  • Mask will not stay attached
  • Breaks or tears in the tubing
  • Stretched plastic at the connection point
  • Tubing is pulling lose from the CPAP
  • Heated tube is no longer humidifying me
Continue reading...
  • By Clay Rollyson
  • /
  • /
Adjustment of your humidifier setting on your AirSense 11 CPAP is super simple. It can even be set to an “auto” mode where the AirSense 11 will adjust. With that being said you should know how it works and what options you have on your AirSense 11.

Manual Adjustment of the AirSense 11 Humidifier

Let’s start off with the manual adjustment option. With this option you simply adjust the setting up or down to account for your comfort. If you are dry when you wake up, then you need to increase the setting. If you wake up with excess condensation or water in your tube, then you should adjust it down. Usually adjusting it in increments of 1 per night is the best bet. Drastic adjustments make it hard to determine what your best setting is. If you are using heated tubing skip to the next section below. Now let’s walk through how to adjust the standard AirSense 11 humidifier settings in detail.

Step by Step Instructions:


  1. Access the Patient Level Menu by pressing “My Options” on the main screen. If you do not see that option press the little house icon in the top left to navigate back to your home screen.
  2. The second setting down should be “Humidity Level”. Press that option to access the settings levels.
  3. Now you will see the settings options. From “off” to the highest setting of 8. Select your desired setting. Remember to adjust in small increments.
  4. Press Ok to confirm the settings change. Then press the house icon to navigate back to your main home screen.

Using a heated tube on the AirSense 11 CPAP for humidity

When you add the AirSense 11 heated tube into the mix you add in a really cool feature… complete automation. When you first plug on your ClimateLineAir heated tube the settings will configure to “Auto” for climate control and for tube temp. In this setting the AirSense 11 will adjust itself to maximize humidity without causing excess condensation. It does this by monitoring your rooms temperature and humidity levels. I recommend everyone start in this setting. If it works, then you are good to go. If not, you can use the instructions below to adjust the humidity setting manually.

Manual humidifier adjustment with heated tube:


  1. Access the Patient Level Menu by pressing “My Options” on the main screen. If you do not see that option press the little house icon in the top left to navigate back to your home screen.
  2. Press the “Climate Control” setting to access that menu.
  3. Press “Manual” to change from Auto to manual humidifier setting. Then press the “OK” button.
  4. Next press the “Tube Temp” setting to change your temperature.
  5. Select the desired temperature and press “OK” to confirm. Tube temperature should be adjusted up as needed to account for excess condensation in tubing or mask.
  6. Next press “Humidity Setting” to access the humidity settings.
  7. Then press the setting you desire, then “OK”, then Home Icon. Remember to adjust a little at a time. Increase setting to add humidity and reduce to reduce humidity.

 
Continue reading...
  • By Clay Rollyson
  • /
  • /
For decades when you hear someone in the CPAP world speaking about a Nasal CPAP mask you think of a clown nose style mask. It surrounds the nose and seals over top of the bridge of the nose. That is a classic nasal mask. Then there was the Nasal Pillow style. This style had small nasal buds that rested on the nostrils to create a seal. Now there is a hybrid style that cradles under the nose. The Cradle-Style CPAP masks give you the ability to seal under the nose like the pillow style while still giving you a similar experience as the traditional nasal style.

What is a Nasal Cradle Style CPAP Mask?

These masks have been around for a few years now and were pioneered by Philips. However, now there are options from all of the other manufacturers that work really well. Each of them has their own pros and cons though. Philips has the DreamWear Nasal Cradle mask. ResMed has the N30i as well as the N30 cradle style. Then you have Fisher and Paykel who has the Evora. All of these masks seal under the nose in a “cradle-style”, but they all have significant differences. Let’s take a deeper dive on each.

DreamWear Nasal Cradle CPAP Mask

The DreamWear was the first CPAP Mask of this style to really catch on. A big reason why is because it worked very well. It has an over the top of the head tube connection which was also game changing for many CPAP users. The frame of the DreamWear Nasal has a ton of flexibility, because it also fits the DreamWear Full and DreamWear Pillows. This mask cushion is available in Small, Medium, Large and Wide. The DreamWear frame is available in Small, Medium, and Large, and the headgear is a standard size. That gives this mask a ton of flexibility. Let’s run through the detailed pros and cons of the DreamWear Nasal.

DreamWear Nasal Cradle Pros:

  • Top of the head tube connection– This feature allows CPAP users to move side to side without dragging a tube across their body. Great for side sleepers.
  • Easy quick connect– Allows you to snap your tubing on and off very easily when you need to get up in the middle of the night.
  • Soft silicone cushions– The cushion that seal under your nose is very soft and silky. This helps to prevent skin contact issues that cause abrasion or discomfort.
  • Headgear Arms– The headgear arms that are now standard on this mask allow the headgear strap to ride lower on the back of the head. Reducing the chance of the strap slipping up the back of the head and breaking seal.

DreamWear Nasal Cradle Cons:

  • Exhalation draft– The port on the front of the cradle allowing you to exhale can be a bit drafty and noisy.
  • Tubing on sides of face– The frame of this mask is what carries the air down to your nose from the top. For some users this tubing is a little too thick and can be uncomfortable. There are soft covers that come with the mask to help with this. Additionally, if the side tube is pinched off some users have reported that they can hear it a bit.
  • Side of nose leaks– The cradle on the DreamWear Nasal is flatter than some of the other option. This can cause leaks up the side of the nose.

N30 Nasal Cradle Mask

The N30 from ResMed is a really cool cradle option. It takes many popular features from the P10 Nasal Pillow and adds in the positives of a cradle mask. The N30 also features the same headgear as the P10 which is really thin and stretchy. It has a front of the mask tube connection which gives the mask a more traditional fit. The cushion size is available in Small, Medium, and Small-Wide. The Adjustable headgear fits most heads very well. Let’s look at the detailed pros and cons of the N30.

N30 Pros:

  • Stretchy headgear is really comfortable– The headgear on the N30 is very thin and stretchy. This makes it very easy to take it on and off plus gives a comfortable fit.
  • Deep cradle provides an effective seal– Side wings of the cushion allow the N30 to seal very well. Especially for users that have had issues with other cradles leaking to the sides of the nose.
  • Quiet and diffused exhalation– There is little to no exhalation draft at all. That means you and your bed partner won’t hear or feel the exhalation.
  • Easy cushion removal– No clips or tricks. The cushion slips on and off the frame easily and will only go on one way. Very simple.

N30 Cons:

  • Headgear is tough to take on and off the frame– When it is time for maintenance on the N30 you should take the headgear off the frame. The way that it attaches makes it really difficult. Plus, it is easy to put it on backwards.
  • Headgear can wear out quickly– The stretchiness of the headgear provides a very comfortable fit. However, when it loses its stretch that pro becomes a bit of a con. Replacement headgear can be purchased separately but will need to be replaced more often than others.
  • No quick-connect for tubing– You do not have the option of disconnecting the tubing and leaving the mask on. This mask is so easy to fit that this may not be an issue, but this is a feature that most others have.

Evora Nasal Cradle CPAP Mask

This is a great new mask from Fisher and Paykel. Fisher always does a great job on masks. They make some of our absolute favorites. The Evora has a traditional front of the face tube connection but has a really unique headgear and fit. The “ball-cap” style fit allows you to slip the mask on and off like a hat. The cushion size is available in Small, Medium, Wide and Large. The headgear is standard, but very adjustable. Let’s dive on the high and low points.

Evora Pros:

  • Headgear is very unique– The “ball-cap” style headgear is very unique. Once you have it sized it slips on and off like a baseball hat. It is also very long-lasting.
  • Effective fit– The stability of this mask is top notch in the cradle-mask category. The headgear, frame and the cushion all have great features that keep it stable on the face.
  • Soft stretchy silicone cushions– The cushion on the Evora is very soft and stretchy. This allows it to use the pressure of the air from your CPAP to help seal. This gives a good seal without having to over-tighten the straps.
  • Quick connecting frame– The headgear and frame pop lose from the cushion very easily. This makes maintenance very simple.

Evora Cons:

  • Frame/Headgear has some hard plastic– For some users the plastic in the headgear and frame can be uncomfortable. Especially if you overtighten the Evora.
  • Cushion can be tricky to remove– The cushion clips in very well. So, while it certainly doesn’t ever fall off, it is kinda tough to get on and off the frame when it is time to replace or clean it.
  • Presses on upper lip for some– We have heard from a few users that the Evora may can cause discomfort on the upper lip. Usually, just a fitting issue, but for some it was a deal-breaker.

N30i Nasal Cradle Mask

The N30i by ResMed is a similar mask to the DreamWear Nasal mask. It features a top of the head tube connection which is great for a lot of side sleepers and heavy movers. The cushion was recently upgraded to provide a softer fit under the nose and a quieter exhalation. The cushion is available in Small, Medium, Small-Wide and Wide. The Frame on the N30i is available in Small and Standard, and the headgear is standard as well. Let’s look at the details of those features.

N30i Pros:

  • Very quiet– The diffused exhalation on the front of the N30i is extremely quiet. It also produces very little draft on exhalation.
  • Stretchy frame– The frame on the N30i allows for a lot more freedom of movement without pulling the cushion loose.
  • Great tube quick-connect– There is a quick connect on the top of the frame where the CPAP tube connects. It detaches and reattaches very easily. Allowing you to keep the mask on while up at night and quick connect back to your tube when you get back to bed.
  • Soft Cushion– The newest version of the N30i cushion does not have any hard plastic that may poke your face. It is very soft and flexible.

N30i Cons:

  • Exhalation feels tough at higher pressures– We have had some feedback from users to indicate that the new diffuser can make exhalation a bit more difficult at higher pressures.
  • Air tube frame can be weird– Much like the DreamWear, the N30i uses the frame to bring the pressure from top of the head to your nose. Some users have reported noticing a reduction in air-flow when they pinch off one side of the tubing while laying on their sides.
  • Slips up on the head sometimes– The strap that holds the N30i stable goes around the back of the head. For people with long hair the headgear sometimes wants to slip up the head and allow the mask to come lose.
   
Continue reading...
  • By Clay Rollyson
  • /
  • /
For many CPAP users the SoClean Automatic CPAP cleaner has been a great option for keeping up with their CPAP maintenance. Then when they receive a new CPAP, the hookups are not the same. For many CPAPs there are specific SoClean adapters that make the connection simple and effective. With that being said there isn’t an adapter for many of the new CPAP models. In those cases, there is an easy resolution.

Universal SoClean to CPAP Connection:

SoClean makes an adapter that has a standard 22mm connection. This allows you to plug it on virtually ANY CPAP on the market. This adapter fits on to the outlet of the CPAP and your tubing plugs on to the other side of the adapter. This universal SoClean adapter comes with a small injection tube that may need to be trimmed or removed for installation. Then you simply plug the long injection tube from the back of the SoClean on to the adapter nipple. This creates the full integration necessary to run your SoClean on any CPAP model. It is important to remember that this adapter does not work with heated tubing. You will need to use standard CPAP tubing on this setup. Check out the step by steps direction below:

1) Disconnect your CPAP tubing from the Air Outlet of the CPAP Machine.

2) Determine how long you want your interior injection tube and cut it. You may also remove it completely if needed.

3) Attach the adapter to the Air Outlet of the CPAP and reattach CPAP tubing to the other side of the adapter.

4) Connect the long injection tube from the back of the SoClean to the adapter nipple.

Click here for the Universal SoClean to CPAP Adapter

 
Continue reading...